

By Ashley Puk
In this new series, go behind the scenes of the McMullen Museum as our Student Ambassadors give you the inside scoop on some of our current projects. First up, Ambassador Ashley Puk of the Digital Humanities Committee takes us through the process of creating digital walkthroughs of the exhibitions.
The best invention of the twenty-first century might just be the ability to see art at the click of a button. Do you want to see Washington Crossing the Delaware? No more having to marry your wealthiest suitor to be able to travel to New York City to see it.1 Sometimes I think we forget how wonderful it is to have this democratic access at our fingertips.
Sure, purists will likely say “art isn’t the same viewed on a screen as it is in person.” In person, you get to see the brushstrokes, the molded piece of clay—the tangible things that an artist labored on for days, months, years. I have to say I agree. However, understanding the geographical limitations of being able to go and physically see art, we at the McMullen want to bring our exhibitions to you. You may have seen our virtual walkthroughs for our last few exhibitions, namely our fall 2017 exhibition Nature’s Mirror: Reality and Symbol in Belgian Landscape and spring 2017 exhibition Rafael Soriano: The Artist as Mystic.
I’m going to take you through how those amazing renderings of our real-life exhibitions are transported directly to your computer screen. If you take a look at any of our walkthroughs, they might remind you of street-view in Google Maps. It works the same way!
Currently, members of our Digital Humanities committee are working on the walkthrough for Cao Jun: Hymns to Nature, including student ambassadors Emily Castro, Tim Pietropaoli, Brantford Park, and Ashley Puk. We all had varying levels of experience starting this project (I had none!) but the best part is learning as you go.
1. Photographing the exhibition(s)
We photograph the exhibitions using a Canon EOS Rebel T6 and a Vivitar 8mm panorama lens mounted on a panoramic attachment to a tripod. The attachment is kind of L-shaped, with a grip that allows us to turn the camera in a stable 360º circle to capture the entire space that we are working in. We plan a floor map of each room and decide which vantage points we want a panorama from. Our most recent walkthrough has about eighteen different vantage points from which which you can view the exhibition.
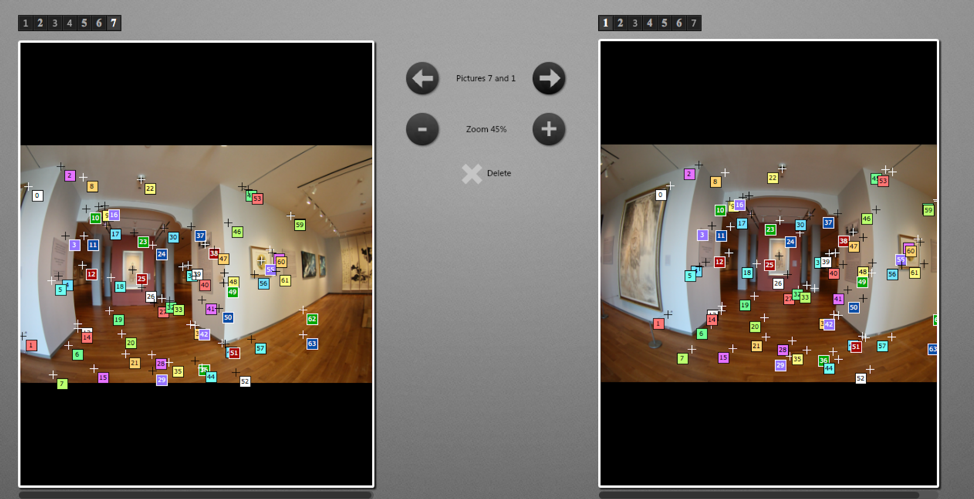
We have to keep in mind that the images will be rendered digitally, so it’s important to take enough photos at each vantage point in order for the program we use, 3DVista, can find control points to connect each image. We try to avoid getting our visitors in the photos but sometimes we can’t avoid capturing our own reflections on the pieces. See if you can find us!
2. Stitching the photos
Once we have photographed all the rooms, we upload them into Stitcher, a program included in the 3DVista package. Stitcher does the hard work for us, i.e. finding the anchor points in each photo for each vantage point to connect them into one smooth, continuous photo. Sometimes the program does not have enough information to smoothly connect the photos, resulting in abrupt cuts between photos that distort the artwork and the surrounding space. To solve that issue, we either have to photograph the space again or manually connect the points to help the program to understand what overlaps from the previous photo connect with the subsequent photo.

3. Make it useful!
Once all the rooms are stitched together, we add the information display cards as clickable points on each photo. This allows you to read them just as you would in person! We upload photos of the display cards into the 3DVista Virtual Tour program and add “hotspots” in the form of white circular information buttons. We can attach the label card images as ‘actions’ that lets the program know we want that image to show up in our walkthrough when you click on each white button.
Then, we add white anchor buttons that connect the images from room to room, so you can easily get to the next room, as if you were walking through the museum yourself.

That’s it! It’s not as complicated as I previously thought. Ultimately, our digital walkthroughs could never replace the atmosphere of walking through an actual museum exhibition, but they allow those who cannot visit us to have the experience, while also acting as an archive and informational source for our previous exhibitions that anyone can access.
Furthermore, exhibition design is its own subfield in museum studies. How art is placed and framed in relation to other pieces, the type of lighting used, and music playing (or lack thereof) all contribute to the atmosphere of an exhibition. Seeing JPEGs of the pieces in an exhibition versus how they were placed by a curator or exhibition designer in a finite space gives art a whole new dimension worthy of study.
I hope this guide was useful and please stay tuned for our next exhibition walkthrough for Cao Jun: Hymns to Nature curated by BC Professor Dr. John Sallis. It will be available in mid-June.